Showing posts with label Cuttlebug. Show all posts

Saturday, 3 May 2014

Doily Card with Butterflies - Thank You

Several weeks ago I ordered some Cheery Lynn dies (which I've been drooling on for quite a while) from its official website.   And I must say for an international order they did an amazing job - my parcel was received within less than 10 days - faster than Amazon.com which usually takes about 14-25 days!

Besides the speedy delivery, I'm also quite happy with the quality. After a few adjustments I found out that it needs just one more piece of card stock paper with the cutting plates, the die can cut perfectly with Cuttlebug.  Here's the thing, different brands of dies have different ridge depth, therefore you'll have try out different thickness of sandwich boards/plates before finding a perfect one.  In the case of Cheery Lynn with 'my' Cuttlebug, just add one piece of paper to the A plate, two B plates and one C plate and it'll do the job nicely.

PS: Even with the same machine sometimes people have different results. So always test and see first.

So here it is, my result of the cheery Lynn doily on a Thank You card.  I also use Martha Stewart Monarch butterfly punch for the big butterfly, as well as my Silhouette Cameo for the smaller butterfly. (I have only one butterfly punch. Note to self: need to get some more. )

I hand draw the line on the Thank You label but it's not perfect. Always tell yourself : if it's perfect it's not handmade LOL


The colour of the doily in this picture is closer to reality, which is similar to the one of white coffee.


Thursday, 1 May 2014

Thinking of You - Embossed and Distressed Card with Botanical Tea Theme

When I received this beautiful Graphic 45 - Botanical Tea 8*8 paper pad, I was completely blown away.  G45 is famous for manufacturing some of the most beautiful patterned papers in the industry, and this paper pad again lives the reputation!  It really made my day as it's a birthday gift from Renee, and I just have to make something beautiful (I try!) with it.


Therefore I made a Thinking of You card to try it out, using Cuttlebug for embossing and distressing the edges a bit too.   and I'm pleased with the result.


I wasn't sure if the card needed some flourishes so I added one, but now it seems to be blocking the beautiful bird and I forgot to distress too.  But overall I'm happy with it.


Monday, 4 November 2013

3 CAS Christmas cards in slightly different layouts


Over last weekend I managed to make some more Christmas cards to cope with the fact that I simple do not have time to make them in mid-November.  Reality is, I'll be travelling to Kuala Lumpur, Dubai and Australia in November and December, plus at the beginning of January we'll be moving to Dubai!  And I haven't started any packing yet!  And I'm still not freaking out. That is remarkable.


So here are the three cards I made - as always I do not put too many elements on the card to maintain a simple visual balance, and they are actually simple to make.  I also put two of these cards in the challenges.  These are my first ever challenges!  Oh and it's simply a joy just to view so many other beautiful cards listed there.


Tools used: Cuttlebug and embossing folder, Spellbinder dies, and Martha Steward doily punch


Distressed Style
Tools used: no special tools required except Croc-A-Dile to punch the little holes. I did distress the panel a bit to make it look a bit vintage but not too much.

I also put this card in Sparkle Creations' Christmas Card Challenge! 


I put the card on a photo frame so it shows the washi tape lining on both sides. And as usual you can see the lacking of my photo-shooting skill.


And there's still more card to make...  BTW I just got my first order from my friend, who needs a birthday card for her sister-in-law, and it has to be finished today. And off I go to make more cards - hey ho!


Wednesday, 30 October 2013

Embossed Christmas Card - Red and Beige

Today is my scheduled scrap-booking date with my good friend, Nathalie, and as usual we produced quite a nice batch of Christmas cards.  Although I didn't make as many as she did (please see her works at http://nathouest.canalblog.com/) , I'm quite happy with the result of this one.


This is actually inspired by Papercrafts Magazine Issue Nov/Dec 2013.
http://www.papercraftsconnection.com/blog/2013/10/novdec-2013-go-to-sketch/

Here's the sketch. Quite easy, isn't it?  Well yes except the bow, which I tried tying it up through a punched whole, and I ended up breaking it through!  In the end had to use a glue gun to make the piece. Whew.

But anyway, I did it, and it looks great!

Woohoo!  So now I have only about another 10 different cards to make.  (I only send 1 style to 2-3 people. I don't make 30 of the same cards and send them to all different people.)


Sunday, 20 October 2013

Stamping and Embossing: Simple Christmas card.

About stamps.

Although I am not a 10-year veteran stamper, it's safe say that most stampers can't feel much difference amongst stamps made of different materials - whether rubber, wood-mounted or clear.  I have pretty bad wooden ones as well as 'cling' stamps which do not cling to the grid block at all. And some say clear stamps can be tricky and hard to line, but stored properly they're still great and easy to use.  And even for larger stamps it still requires good skills to get a perfect image.  So to me the there's no best brand or type.  More importantly it's the ink pads you choose to achieve different effects, and the tips to stamp a perfect image that really matter.


For this card I use three of the most commonly used card-making techniques - stamping, embossing and die-cutting. For stamping this card I use Studio g stamps, one mounted, one not.  Studio ghas lots of inexpensive clear and mounted stamps, and in terms of quality, I can't feel any difference from other popular brands such as Hero Arts or KaiserCraft.  However I did make a mistake, which is that I chose a textured card stock to make the base. It caused the stamp not able to adhere ink onto the surface and therefore you can see some dents in the image.


Materials used:

Embossing and cutting - Cuttlebug, Spellbinder Nestibilities Dies
Stamping - (for the tree and sentiment) Studio g clear and mounted stamps
Cardstock - AC

Layout-wise, this is probably one of the most easy cards I made. And it's cute too. :-)


Saturday, 12 October 2013

Heat-embossing Happy Birthday Card

In general, I'm quite a happy woman - I have a really cool husband who is a big supporter of whatever I do, a 3.5 year old daughter who throws her tantrum like - never, and a whole bunch of good friends who are funny, interesting, and share their lives with you sometimes in a silly way just as you do with them.  And I sleep well, eat well, and have little things to worry about. As a result, I don't have migraine very often. Maybe once a month?  

But yesterday I had one that lingers in my head, on and off for a whole day.  Perhaps that explains why out of the blue I made a card using these colours.  But they turn out great!  :-D


To shift my thoughts away from too much youtube, which I think is why I had migraine, I 

1. Made card base
2. Picked a blue patterned paper and red embossing powder and heat-embossed it.  
3. stick it to the card. Adhere ribbon
4. Affix pearls to Happy Birthday die cut and adhere the piece to card.


Tools used
1. Zing! Embossing powder - Rouge
2. Spellbinder - Nestabilities Labels 4
3. Cuttlebug (to emboss) 
4. Staz On Solvent Ink Pad -Blazing Red
5. Martha Stewart Butterflies Stamp Set


And the result is a really cool combination of red and blue, and the red embossed butterflies really pop!  It also proves that it's really not my fault to burn the paper the other day when trying to emboss a panel at Nathalie's place. Hint: Someone should probably consider changing her 10-year-old heat gun. Hehehe.


Just look how beautiful the emboss is!


Saturday, 28 September 2013

Thank You Card - For the International Volunteer Managers Day

Last week I met Renee Tan, a Singaporean mum whom I was chatting with when checking out at Made With Love, a popular and re-opened scrap-booking store in Singapore.  It makes me realize just how friendly (and chatty, HA!) scrap-booking people are in general.  Scrap-booking people are usually generous too, and so is Renee.  

During chatting she mentioned there's a Make a Card for the Needing group founded by her friend that I may be interested.  To be honest, I've heard of International Volunteering Day, but not International Volunteer Managers Day.  But this lady is someone Renee knows so should be ok. And with all the money spent on card-making it's really time to make some cards for a good cause.  So I said to myself to make four of the same Thank You cards and send to the founder.  

However, when starting making a second Thank You card I realize I don't really like making same cards. (Not good for business if I ever want to start one. But now it's still a vague idea so meh) So I went along and made 2nd and 3rd cards, of different designs.

First Card 


With the first card the only thing requiring a tool to make is the old typewriter, which I used the "sketch" function of Silhouette Cameo. It's really cool to see the machine work its pace and come up with a beautiful drawing, and then cuts it out flawlessly! I also used a glitter sketch pen so the drawing has really cool shimmer in the lines.


Second Card


With the second card, there was not any special tool needed to make, The only thing is the flower tag, which I made it myself using a Crop-a-Dile to punch smalls, and the flower washi tape from mt. (a Japanese washi tape manufacturer)  


Third Card


I'm happy with the layout of every one of them. But I'm particular fond of the third one simply because the tag tail is just too cute especially with the the twine tangles!  And that was an idea I thought would be fun to make, and it turned out great.


As my plan goes, I should be able to make the fourth one (in progress) within deadline.  Maybe I'll copy one of the previous designs to save time.  But anyways, Hip hip hooray!


Thursday, 19 September 2013

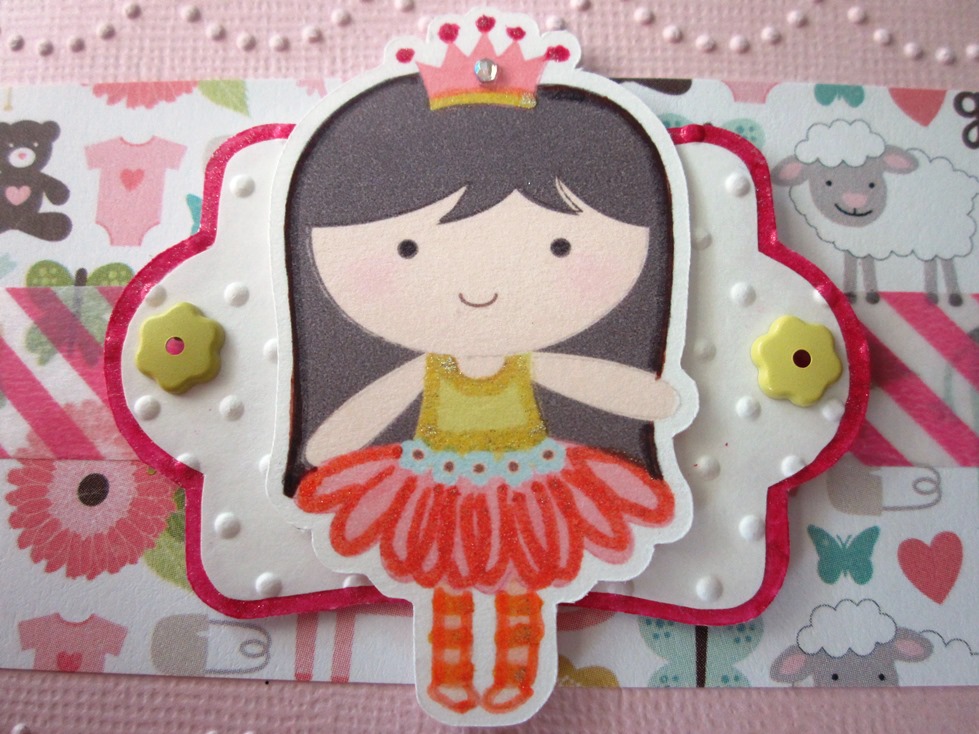
Pink Happy Birthday card. Fit for a little princess.

I must admit I don't use my Silhouette Cameo(bought last June) often than I think.  It is a great tool, and especially with the Print-and-Cut and the Sketch function I simply must justify for its value this year.

Luckily with the encouragement from my friend Nathalie I started not only learning new techniques but also have picked up the machine again. The result came beautifully today I think I'm going use the tools a lot more.

This card is for Ashley's school mate, Victoria. She's having her 4th birthday so I made it for her. As far as little girls are concerned, who doesn't like a fairy princess on a pink card?


1. Make pink card from card stock.
2. Do partial embossing with Cuttlebug embossing folder. Like this
3. Adhere a cute patterned panel on middle section of the card. Affix washi tape across center.
4. Use cutting machine to cut out two labels with the same shape. Colour the edge of the bigger piece, emboss the smaller piece, and adhere. Affix mini flower brads. Use foam tape to adhere label to card
5. Use cutting machine to cut a princess/fairy. Use glitter colour pens to emphasize hair, skirt and so on, and affix sparkle on crown. Adhere to card with foam tape on only head and feet.

6. Stamp Happy Birthday on paper and trim. Adhere to card. Finished. YAY!


Tuesday, 17 September 2013

Love card - Partially embossing technique

Last night as usual I was just watching youtube to see if there's anything new inspirations, and I came across this video that I decide to try today.  It's called 'Partial Embossing' technique, and after a few practices I found I needed some adjustments with the thickness needed to go through Cuttlebug.  I guess every Cuttlebug has it's own personality and tolerance of abuse. (HA)  But once you got the right thickness you'll know it's so easy!


1. Make white card from card stock.
2. Emboss card with the technique mentioned (see video below)
3. Stamp sentiment in the blank circle area.
4. Punch a small hole on side of card and tie with baker's twine.


You can check this video to learn how it works, and then just follow the basic principle to make your own design.  I tried the partial embossing technique( the first part of embossing in video) with my Cuttlebug and it didn't work, so I added another blank card(thickness of two pieces of paper) and it worked beautifully. 

Double embossing with Cuttlebug and nestabilities


Saturday, 14 September 2013

Baby Boy card - Welcome Little One

Marie-jose Jed is one of my good friends I met in Singapore. She's also the first Lebanese French I've known, and a very talented painter/artist indeed.  This mum is so multi-tasking that she does cooking, baking, teaching at college, organizing her own exhibition, and was pregnant for the past 8 months while looking after her three-year-old daughter at the same time.  Just two weeks ago she finally unloaded and had her second child, Peter, and so I made a baby boy card for the new arrival.

With this card you can use a Cuttlebug or similar embossing machine to do it, but you can also do without by using just patterned paper to create visual contrast.  With the baby pram I use Print and Cut with Silhouette Cameo to make it, and add sparkles and brads to it.  I don't do cute cards a lot but this is one of them.  Still it looks clean and layout-wise simple, which is what I like.


1. Make 5.5 inch square card from card stock
2. Emboss two panels, one white and one light blue, with different embossing folders. Adhere both to card.
3. Affix blue chevron washi tape onto a white strip, trim, and adhere to card. Adhere scalloped border to card. Adhere light yellow ribbon with double-sided tape.
4. Punch two circles and adhere. Use silhouette cameo to print and cut out pram, adhere with sparkle. Affix brads. Adhere pram onto circle piece.
5. Stamp Welcome Little One to strip. Trim and adhere with foam tape.
6. Adhere circle piece with foam tape.

It's a lot of gluing and measuring, but I'm happy with end result and to be honest this is still probably quite simple to some of fellow card-making artists!  


Close-up :-)


Sunday, 8 September 2013

A pink and feminine card for a good friend

Living in Singapore for over two years, I found myself deeply in love with many things that are so uniquely of this particular dot on earth.  From tourist attractions and public facilities, eclectic alleys and lanes, rich food culture and respect of different races... to name a few.  I also made friends with some of the nicest people.  And as a friend I would love to make a card for each one of them.


1. Make white card from card stock.
2. Make two pink panels, one slightly lighter than the other one.
3. Emboss the light link panel with Cuttlebug. Adhere to the darker pink panel.
4. Trim and make a white panel same width as the pink panel. Punch scalloped border on one side. Affix washi tapes. Adhere white panel to the pink body. Adhere to card.
5. Punch and stamp chandelier. Adhere to card.

( Generally I like clean cards. I never like a card that's too complicated or overflowing with ribbons and 3D flowers.  So I didn't add any thing like pearls. But maybe someday I'll try)


Thursday, 5 September 2013

Get Well Soon card - for Teacher Lyz

Ashley's English teacher, Lyz, is pregnant but she has diabetic due to her pregnancy and a few weeks ago she's checked into the hospital to make sure everything's alright.  Therefore I made this card for her, wishing her the all the best and safe throughout the pregnancy.


1. Make card base.
2. Make a brown panel from brown card stock. Use border punch to punch scalloped border on one side. Affix wash tapes on both sides. Adhere to card base
3. Die cut three butterflies from 3 different card stock. Stamp the medium one and emboss the smallest one with Cuttlebug. Affix in size order. Affix sparkles on the butterfly. Adhere to card.
4. Stamp flourishes and affix sparkles on card.
5. Stamp sentiment.


Thursday, 29 August 2013

'Hello, Friend' card

I love paper crafting with my French friend, Nathalie Durand (http://nathouest.canalblog.com/).  We do lots of stamping, distressing, making cards and mini-albums, babbling about daily things and living in Singapore.  One thing worth mentioning is that this lady is always so efficient in making cards.  She can make six cards out from scratch whereas I can barely finish two within two hours.  Yesterday, however, I made three cards, which had never happened before.  I guess not over-thinking or overrunning your mind flow is very important.  In other words, focus, focus, focus.

And one of the cards I made. It's a bit cute but not over the top.  Quite simple actually.


1. Make white card base
2. Make a shiny pink panel that is slightly smaller than the card base. Leave it and don't adhere to card base yet.

3. Make a white rectangle panel a bit smaller than the pink panel. Emboss it with Cuttlebug. Adhere it to the pink panel. Then adhere the to card base. 
4. Stamp bottle, Hello Friend and heart on a piece of white paper. Trim around the shape of the bottle. 
5. Find a cute patterned paper from cardstock and trim it.  Adhere to card. Adhere the bottle to card with foam tape.


Tools used:

Paper Trimmer, Scoring board, scissors, adheresive (glue or glue tape), Cuttlebug embossing machine and embossing folder, acrylic block (for stamping), foam tape.