Showing posts with label Distressing. Show all posts

Friday, 3 October 2014

Simple Distressed Christmas Card with Wreathe, and a Twine

I have just made a series of Christmas cards recently for some of my friends.  They are amazing mums and are flexible, knowing that I don't have many stock due to the pricey supplies in Dubai.

More are coming, but here's one of them.


It's actually very easy.

Distress the white base card with distressing ink(Colour: scattered straw).
Stamp wreaths on two diagonal corners. Decorate with red liquid pearls randomly around the wreathes.

Cut a strip of white paper and knip off ends with scissors to make it look like a label. Distress edges.   Stamp sentiments and leaves, and decorate also with liquid pearls.  Use foam tape to adhere the strip onto base.

Finally tie the twine on just below the sentiment strip and you're done!


Tuesday, 27 May 2014

Share Your Smile - Quick and Simple Mini Journal

This morning I saw a great mini album/journal tutorial and decided immediately to use some scrap papers make one myself.  It turned out very simple and took less than 10 minutes to complete the basic structure.  Thanks to PaperVine (See tutorial HERE) I made yet another mini album!


 From past experiences I've learned that mini albums tend to get bulky when you put everything on it.  Therefore this time I've put a brad on the front page and use a twine to wrap and fasten around the brad, and it worked!

What's on the cover:

1. stamping (Carte Postale stamp, Stampendous)
2. Washi tape (pink lace, My Mind's Eye)
3. Border punch-out (Pink. Martha Stewart Deep Embroidery punch)
4. Scrap papers from different paper pads
5. Distressing ink (Rangers - Tim Holtz. Gathered Twigs.)


The mirror stamp is from Kaisercraft. 

Doily die from Cheery Lynn

Stamps are the freebies from a magazine.  Pocket on page right. 

(last page)


Thursday, 22 May 2014

My Simple Botanical Tea Mini Album

Last week had been both a pretty good and bad week.  But I'm just going to highlight the good ones here.

Last Tuesday friends and I gathered together at Eliza's apartment for a lovely brunch, and we had such a great time catching up.  Besides eating yummy home food and chatting, everyone's got something for someone.    My appleTV box that Joanne bought for me via Groupon, and my Cinch (woot!) that Eliza's husband got for me whilst he was in USA, the stamp I borrowed a while ago to return to Ally, the fun Korean label maker thing Joanne got for everyone (cept me cos I got one already) which was ordered and delivered all the way from Taiwan, my stamping tools and ink pads Joanne has to return to me and so on.  It was such a joyous occasion which pretty much pushed away all the bad driving test results that caused my depression in May.

So for the rest of the week, I decided to stick with the happy thoughts and continue with my mini album challenge with Graphic 45, and finished it yesterday.  I want to give this to Eliza as a token for bring me back the WRMK Cinch binder all the way from USA.  I hope she likes it.


This is my third mini album, and I must admit it's not as professional as some of the others made with G45 paper.  But as a novice crafter I'm happy with the result.


When I first started it I just took an inspiration from Pinterest showing how to make a simple mini album without binding rings (the Cinch was not here yet!)  Also I didn't want to make a lot of layers or embellishments which might make the album look too bulky.  Therefore, there's mostly distressing and stamping and not so much pockets or labels.  But still the velcro tab still doesn't close completely. I'm a little bit worry when the photos are added would it still close properly.  We'll see.

front cover


front and back cover


Inside pages


The Graphic 45 papers are so beautiful and well designed. Had a great time working with them too.

Thursday, 1 May 2014

Thinking of You - Embossed and Distressed Card with Botanical Tea Theme

When I received this beautiful Graphic 45 - Botanical Tea 8*8 paper pad, I was completely blown away.  G45 is famous for manufacturing some of the most beautiful patterned papers in the industry, and this paper pad again lives the reputation!  It really made my day as it's a birthday gift from Renee, and I just have to make something beautiful (I try!) with it.


Therefore I made a Thinking of You card to try it out, using Cuttlebug for embossing and distressing the edges a bit too.   and I'm pleased with the result.


I wasn't sure if the card needed some flourishes so I added one, but now it seems to be blocking the beautiful bird and I forgot to distress too.  But overall I'm happy with it.


Thursday, 10 April 2014

H O M E - Distressed Banner Made with Chipboard and Pattened Paper. Simple and Elegant!

It's a long story.

Having finally finishd the birthday card for my husband, (and it wasn't a good one.) I was only starting to work on a blank binder album that was left along in my storage trolley for quite some time.  And last week, I saw a super cute mini album on Pinterest.  So I changed my mind again to make the mini album and ditch the binder aside in the corner of my craft table.  And then half way on my making of this mini album, again I spotted on Pinterest a gorgeous distressed banner that looked both phenomenal and easy to make, so I decided to make a similar one following the inspiration.  Somehow I managed to finish it in just one afternoon.  At least one thing is done.

This tells us two things.
1. Only if you really know what you want to make, and really stick to it can you finish the project., and

2. Pinterest is evil.


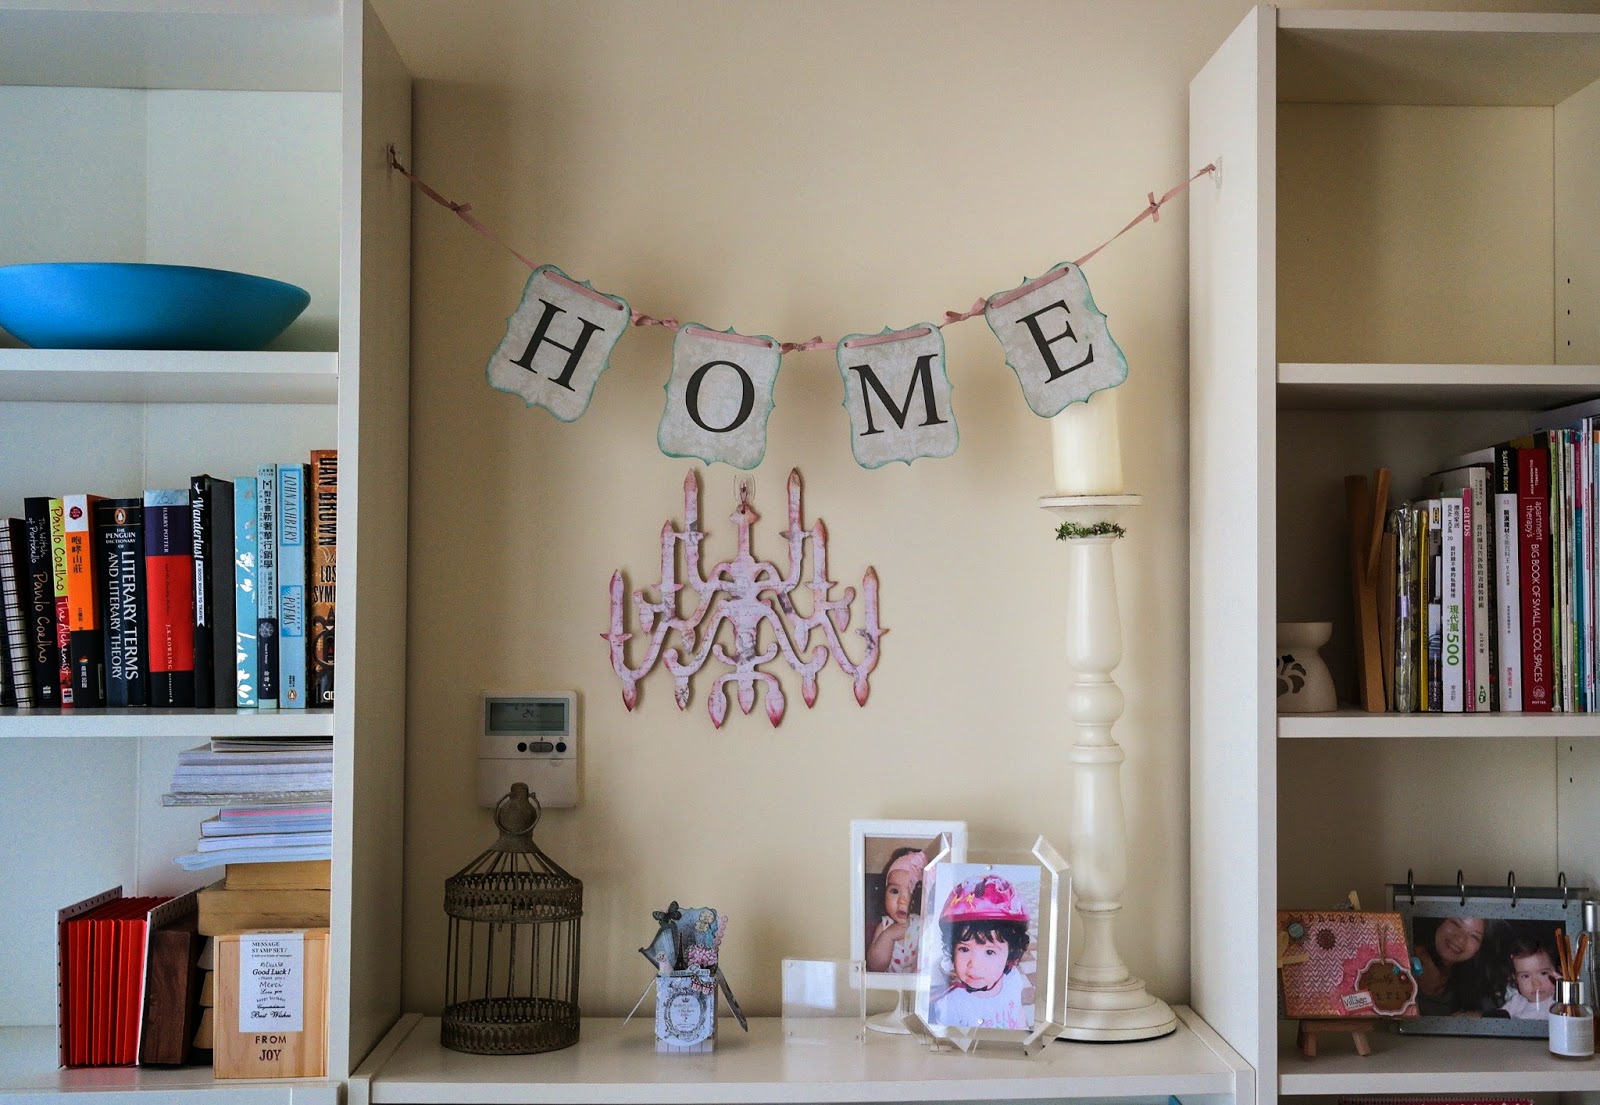
Ok, now here's the end product. Nice, isn't it?


So here are the steps. And for a 'slow-hand' like me, I literally finished the whole thing within like 2 hours, which is just unseen before.


1. Use your cutting machine (Silhouette or Expression, anything that can cut labels) to cut out four flourished labels on a 30cm by 30cm patterned paper, like this.


2. Use the rest of the cut-out patterend paper and trace the same shapes on a piece of chipboard. as below


3. Hand-cut (or use a machine to cut the same shapes in same sizes) on the chipboard

4. Stick the patterned paper to the chipboard with glue. (don't worry if the paper is slightly bigger than the chip board. No one can see it from the front. 


5. Now the fun part! Get your distressed inks and applicator out, and distress the edges of the patterned side of the chipboard.  I mix the two colours first on the mat with the applicator, test it on other paper, and then gently brush the edge of the chip boards. 


6. Next is the letters. I use my Silhouette Cameo machine to cut out H, O, M, E on a grey cardstock.  The font I use is Times New Roman. Then distress the edges of the letters with a slightly heavier colour than the cardstock.  I use Vingate Photo.


7. Stick the letters to the chip boards, and then punch two holes on top corners on them.  Then use ribbons to make them into a banner!  Jobs done!


PS: To make sure the chip boards don't slide on the ribbons I also use hot glue gun to fix them on the preferred spots.  I also tie knots on the hooks on both ends of the ribbons.  Very happy with the result!


Friday, 21 March 2014

Card in a Box - French feminine and Shabby Chic

So on Facebook's Card-Making group I see lots of people posting their card-in-a-box pictures with various themes and styles, and I thought 'well it looks fun, but too much work!'  so it never occurred to me to spend time on it.

But as the days gone by and people are still uploading their projects.  My defenseless brain waves started sending messages telling me to work on it, so I searched on Youtube and found many nice videos showing how to make it.  And this is one of them, with subtitles on the specifications of the card size and scoring measurements.

Serenestamper   http://www.youtube.com/watch?feature=player_detailpage&v=7XHN5WG2hOQ


(It breaks my webpage a little bit but at least people can see it better.)


But since my Silhouette Cameo has spoilt me so much and done many cuttings from very intricate doily designs to simple squares, a handmade box is nearly impossible to make by hand.  So I searched 'Card in a Box' on Silhouette and found many with the basic box card design plus different themes. I picked a random one and started cutting the box and assembling it.  Then I used the good old Kaisercraft "Bonjour" 6.5*6.5 paper pad, hand-cutting out some elements and started assembling them. I also got the same Kaisercraft "Bonjour" stamps and used them with some distressing.

Other elements (the harp, the front and side panels) are from this patterened paper: FABSCRAPS-Marie Antoinette Collection.


Here it is, the final product. Not too bad an attempt. :-)

Some elements are actually coated. Also see below for the fold-up look.


The sentiment Aimer La Vie is stamped and distressed.


That's all. Basically selecting style and appropriate elements takes the majority of time. But other than that the box itself is fairly easy to make. Cheers!